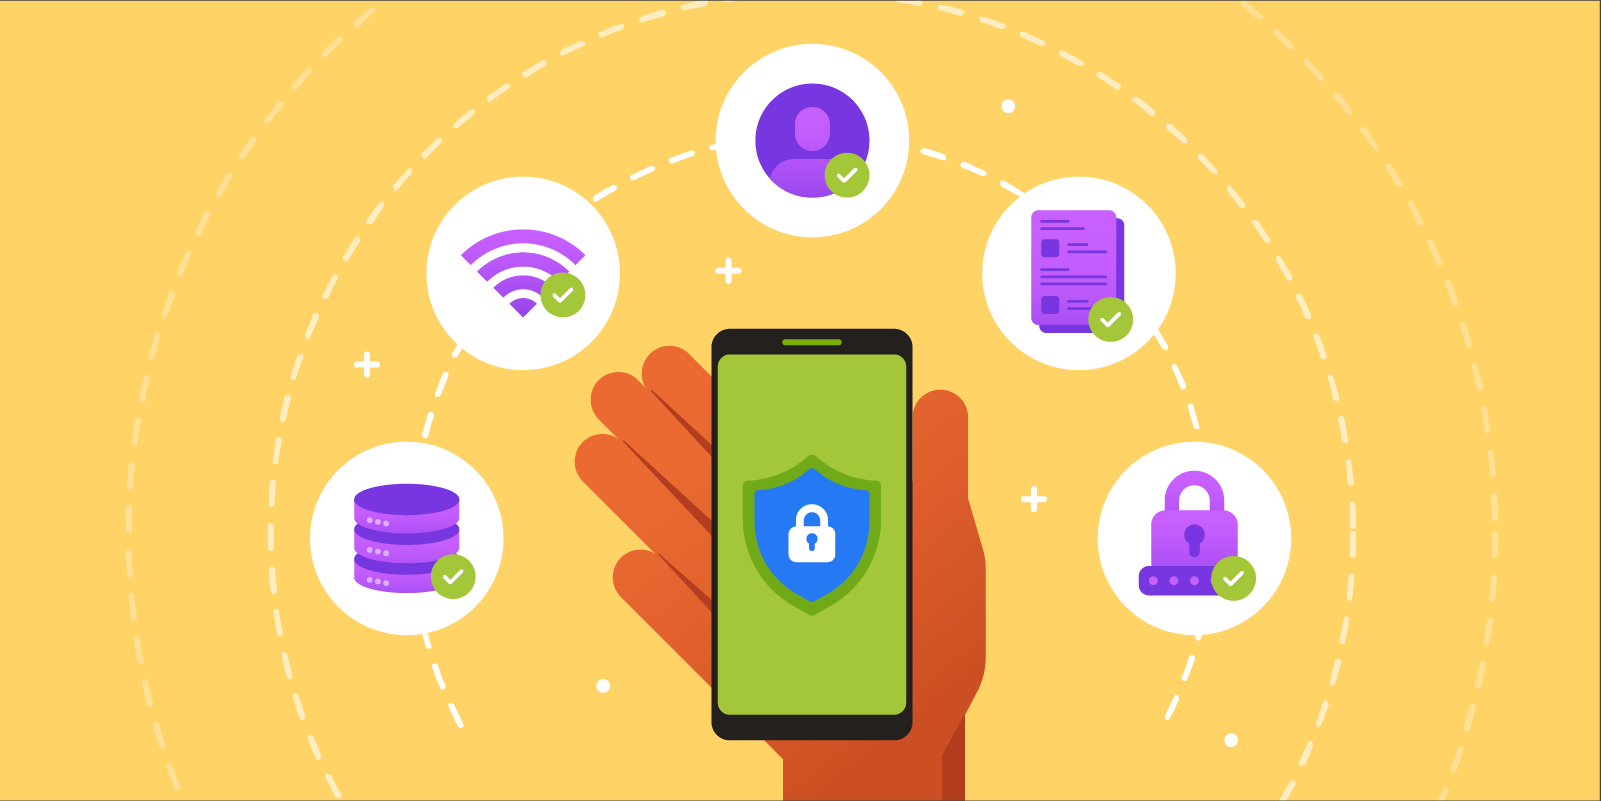
Releasing an application that is highly performant and packed with great designs does not always mean perfection, not without a severe guarantee of security and reliability. This is extremely important given the tremendous amount of data exchanged in mobile applications nowadays, including sensitive and nonsensitive ones.
Why does security matter? 💭
Having a device that you can always carry along to accomplish your day is one of the greatest inventions ever, and there is no doubt that most people rely on their phones to achieve their needs these days. Those activities could range from socializing, travel planning to online shopping and banking, etc.
To make all these functionalities possible, developers must utilize users’ personal data like location, contacts, and device files. Thus, it is essential to have security measures in place to protect information from getting into the wrong hands. Indeed, most developers focus on releasing their apps to meet the business expectations in both functionality and delivery timeline. Unfortunately, the Security sector is often overlooked, which usually fails Penetration Testing.
In the following sections, we present some standard practices in security for your Android application. These are the basics but highly yield results you can apply when storing, handling, or transmitting sensitive user data over the internet.
1. Secure Networking
Transferring data over the internet is not a very straightforward uni-direction thing. Before arriving on the other side, your data stops in between various interconnections. This exposes a risk of being intercepted, your data getting altered, or silently stolen. Such activity is commonly known as the Man-in-the-middle attack. Once manipulated, attackers could access critical data and impersonate users’ behaviors. Using HTTPS to communicate is a way to prevent this exploitation.
In Android, a typical (but not recommended) exercise is creating a self-signed certificate and a proxy that allows visibility of HTTPS or SSL (Secure Sockets Layer) traffic. Although Google prohibited this starting from API 24 or higher, as described here:
- Apps that target API Level 24 and above no longer trust user or admin-added CAs for secure connections, by default.
- All devices running Android Nougat offer the same standardized set of system CAs—no device-specific customizations.
Instead, Google introduces another technique to limit the set of certificates an application can accept by restricting the set of CAs they trust or by Certificate Pinning.
Certificate Pinning is one of many techniques that mitigate “Man-in-the-middle” attacks against secure HTTPS communication, and there are several ways to implement SSL pinning on Android. We will discuss a few in the following.
Implement TrustManager
TrustManager is a native platform component implemented in various versions. They are responsible for managing the trust material used when making trust decisions and deciding whether a peer’s credentials should be accepted.
To implement TrustManager:
- Step 1: Add the certificate file to the app (You can add it under
assetsdirectory). -
Step 2: Create an
inputStreamfrom the Certificate resource file and then load theKeyStoreobject via that stream.val inputStream = resources.openRawResource(R.raw.trust_manager_cert) val keyStoreType = KeyStore.getDefaultType() val keyStore = KeyStore.getInstance(keyStoreType) keyStore.load(inputStream, null) -
Step 3: Create a
TrustManagerFactoryinstance initialized with theKeyStore.val tmfAlgorithm = TrustManagerFactory.getDefaultAlgorithm() val trustManagerFactory = TrustManagerFactory.getInstance(tmfAlgorithm) trustManagerFactory.init(keyStore) -
Step 4: Create
SSLContextthat uses our TrustManager and configure the URLConnection to use a SocketFactory from our SSLContext.val sslContext = SSLContext.getInstance("TLS") sslContext.init(null, trustManagerFactory.trustManagers, null) val url = URL("http://www.yourdomain.com/") val urlConnection = url.openConnection() as HttpsURLConnection urlConnection.sslSocketFactory = sslContext.socketFactory
💡 This technique requires interacting directly with the framework API. This means that the implementation is conducted on a reasonably low level. Hence, you should be cautious.
OkHttp and CertificatePinner with Retrofit
If your application is using OkHttp, Certificate Pinning using OkHttp is easy.
It requires creating an instance of CertificatePinner using a dedicated builder with the server’s corresponding SSL certificate fingerprints (To find out how to get the SSL certificate fingerprints, check this guideline).
The fingerprints can be added directly to the CertificatePinner.Builder or configured dynamically from the build process.
Afterward, we can instantiate an OkHttpClient instance with the predefined CertificatePinner.
Here are the detailed steps:
-
Step 1: Create
CertificatePinnerandOkHttpClientwith the SSL certificate fingerprints.val certificatePinner = CertificatePinner.Builder().add( "www.yourdomain.com", "sha256/ZDCF6O5AB8WPKDP7V2+mqodtvbsTRR/D74FCU+CEEA=" ).build() val okHttpClient = OkHttpClient.Builder() .certificatePinner(certificatePinner) .build() -
Step 2: Create Retrofit with the created OkHttp instance.
  val retrofit = Retrofit.Builder()
      .baseUrl("https://yourdomain.com")
      .addConverterFactory(GsonConverterFactory.create())
      .client(okHttpClient)
      .build()
Network Security Configuration (API ≥ 24)
Starting from Android API 24 (Nougat), there is an easier way to achieve Certificate Pinning. The Network Security Configuration feature was introduced, which allows developers to configure network security settings with an XML file instead of the application code.
Here is how to achieve it:
- Step 1: Create a
network security configfile under res/xml/network_security_config.xml. -
Step 2: Set up the configuration file and add the SSL certificate fingerprints, along with your domain information.
<?xml version="1.0" encoding="utf-8"?> <network-security-config> <domain-config cleartextTrafficPermitted="false"> <domain includeSubdomains="true">yourdomain.com</domain> <pin-set> <pin digest="SHA-256">9hdyeJFIEmx2Y01oXXXXXXXXXXmmSFZhBXXXXXXXXXX=</pin> <pin digest="SHA-256">9Pacxtmctlq2Y73orFOOXXXXXXXXXXZhBXXXXXXXXXX=</pin> </pin-set> </domain-config> </network-security-config> -
Step 3: Define the
android:networkSecurityConfigattribute in the<application>tag (in your AndroidManifest file) referring to the previously created configuration file.<?xml version="1.0" encoding="utf-8"?> <manifest xmlns:android="http://schemas.android.com/apk/res/android" package= "com.packagename.id"> <application android:networkSecurityConfig="@xml/network_security_config"> … </application> </manifest>
The Network Security Configuration also supports Self-signed Certificates or Certificate Authorities that are not trusted root system certificates. You should only use this during development, not for an official release.
Payload Encryption
When making an API request, applications commonly require encryption to secure the entire request and response body payload. By default, data transferring between client applications and the backend is secured with TLS/SSL, which means data is encrypted before transmitting across networks. Optionally, we can implement extra payload encryption as a second security layer for applications requiring hardeners, like financial applications.
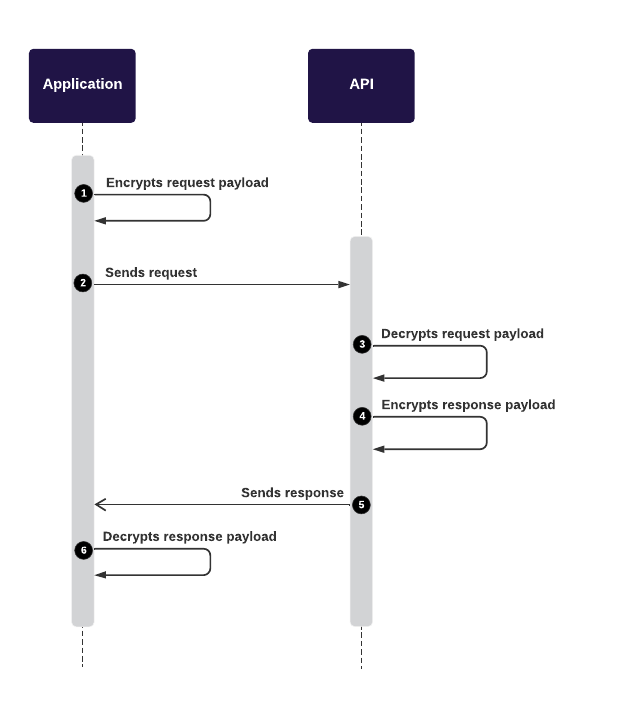
The mobile application encrypts the Request payload with a Public Key before transmitting it to the backend.
After that, backends decrypt the encrypted payload with the corresponding Private Key.
It will then compute and encrypt the Response payload with the Private Key before sending it back to the front-end applications.
Finally, the applications can decrypt the Response payload with the Public Key to reveal data.
2. Secure Data Storage
After users successfully log on to an application, some user information can be cached locally for faster retrieval and convenient usage.
A bold recommendation is DO NOT store sensitive information locally (like credit card information).
For less sensitive data, applying Sensitive Data Protection is recommended to protect personally identifiable information, private data, or other credentials. They should never be stored in plaintext, whether in a database or other external files. Having extra encryption also offers an additional level of safety.
Following are some techniques to achieve it.
Encrypted Key-value Storage
Android provides many ways to store data, and SharedPreferences is one of them. It is the most popular key-value persistence used by developers.
SharedPreferences offers a storage solution for text-based data. Apps can leverage this to persist information about the user or related technical values throughout its lifecycle. But it is worth noting that data stored in SharedPreferences is not encrypted by default, making them the most favorite target for attackers. For this reason, encrypting the data before saving it in SharedPreferences can help prevent outsiders from revealing them.
With devices that run Android 6 (API 23) or later, Android offers a ready-to-use encrypted storage solution with EncryptedSharedPreferences.
val masterKeyAlias = MasterKeys.getOrCreate(MasterKeys.AES256_GCM_SPEC)

val sharedPreferences = EncryptedSharedPreferences.create(
    "secret_shared_prefs",
    masterKeyAlias,
    context,
    EncryptedSharedPreferences.PrefKeyEncryptionScheme.AES256_SIV,
    EncryptedSharedPreferences.PrefValueEncryptionScheme.AES256_GCM
)

// Use the shared preferences and editor as you normally would
val editor = sharedPreferences.edit()
editor.putString("key", "value").apply()
After the introduction of Jetpack libraries, DataStore was introduced to replace the SharedPreferences. It is based on protobuf to structure the data and stored it under a .preferences_pb file.
While the information is not human-readable, it is not considered encrypted and hence, unsecured. Hopefully, the Android team at Google will release another solution like EncryptedDataStore soon. 😀
File Encryption (API ≥ 21)
To encrypt files other than texts, Android also provides EncryptedFile. It can be used to initialize encryption to read or write a file to the system.
val masterKeyAlias = MasterKeys.getOrCreate(MasterKeys.AES256_GCM_SPEC)
val directory = "./directory"
val fileToRead = "mydata.txt"
val encryptedFile = EncryptedFile.Builder(
    File(directory, fileToRead),
    context,
    masterKeyAlias,
    EncryptedFile.FileEncryptionScheme.AES256_GCM_HKDF_4KB
).build()
Android Keystore System
Please do not confuse it with the Keystore used to sign your release packages (APK, AAB). Before we begin, we should clarify the Android Keystore system. According to the Android team:
Android Keystore system protects key material from unauthorized use. Firstly, Android Keystore mitigates unauthorized use of key material outside of the Android device by preventing extraction of the key material from application processes and from the Android device as a whole. Secondly, Android KeyStore mitigates unauthorized use of key material on the Android device by making apps specify authorized uses of their keys and then enforcing these restrictions outside of the apps’ processes.
— Android Keystore system
Say you want to incorporate KeyStore features to encrypt and decrypt data. Here is how:
- Step 1: Generate an encryption key with
KeyGenParameterSpec.
val keyGenParameterSpec = KeyGenParameterSpec.Builder("KeyAlias", PURPOSE_ENCRYPT or PURPOSE_DECRYPT)
    .setBlockModes(BLOCK_MODE_GCM)
    .setEncryptionPaddings(ENCRYPTION_PADDING_NONE)
    .setRandomizedEncryptionRequired(true)
    .build()
- Step 2: Generate a key for encryption, and the created key will be saved to the Android Keystore under the alias. Note that each entry in a
keystoreis identified by an “alias” string.
val keyGenerator = KeyGenerator.getInstance(KEY_ALGORITHM_AES, "AndroidKeyStore")
val secureRandom = SecureRandom()
keyGenerator.init(keyGenParameterSpec, secureRandom)
keyGenerator.generateKey()
- Step 3: Create a function to extract the
SecretKey.
private fun secretKey(): SecretKey {
    val keyStore = KeyStore.getInstance("AndroidKeyStore")
    keyStore.load(null)
    val secretKeyEntry = keyStore.getEntry(keyAlias, null) as KeyStore.SecretKeyEntry
    return secretKeyEntry.secretKey
}
- Step 4: To encrypt data represented in ByteArray type:
private fun encrypt(decryptedBytes: ByteArray): EncryptedData {
    val cipher = Cipher.getInstance("AES/GCM/NoPadding")
    cipher.init(Cipher.ENCRYPT_MODE, secretKey())
    val ivBytes = cipher.iv
    val encryptedBytes = cipher.doFinal(decryptedBytes)
    return EncryptedData(ivBytes, encryptedBytes)
}
- Step 5: To decrypt the encrypted data using the same mechanism:
private fun decrypt(dataToDecrypt: EncryptedData): String {
    val cipher = Cipher.getInstance("AES/GCM/NoPadding")
    val spec = GCMParameterSpec(128, dataToDecrypt.iv)
    cipher.init(Cipher.DECRYPT_MODE, secretKey(), spec)
    return cipher.doFinal(dataToDecrypt.encryptedData)!!.contentToString()
}
Encrypt/Decrypt data manually (not recommended)
Suppose your application needs to support devices with an API level lower than 23 (Android 6.0). In that case, you need to create a customized algorithm to encrypt the data securely before persisting it (to SharedPreferences, Databases, Files, etc.). To reveal the encrypted data, you will have to decrypt them manually to convert them back to the original data.
💡 Please check out this article for detailed information on how to achieve it with
Cryptographyin Android.
3. Data Protection
User (Sensitive) Data Protection
In Android, the MediaProjection could allow attackers to capture users’ screens and record system audio without the user’s consent.
The typical attack scenario involves the user profile screen with sensitive data showing when the application is in the Android Recent Apps, or the screenshot is captured without user awareness.
To mitigate this concern, use WindowManager.LayoutParams.FLAG_SECURE to disallow screenshots or screen records on a screen window. This simple solution also prevents leaking user-sensitive data on the current screen from the Recent Apps by displaying a blank screen:
class MyActivity : AppCompatActivity() {

    override fun onCreate(savedInstanceState: Bundle?) {
        super.onCreate(savedInstanceState)
                ...
        window.setFlags(
            WindowManager.LayoutParams.FLAG_SECURE,
            WindowManager.LayoutParams.FLAG_SECURE
        )
                ...
    }
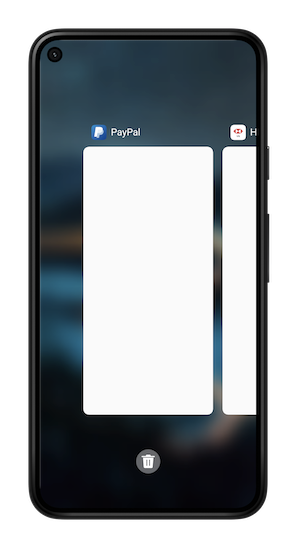
With this setting, the recent screen is blank in the Recent App list, and the user isn’t allowed to take screenshots on MyActivity.
💡 In case you need to allow the user to take screenshots or display a customized application thumbnail instead of displaying a blank default screen, please check out our recent-apps-thumbnail-hiding library for reference:

Root Detection
While rooting your Android device offers many avenues of experimentation, it is also the most substantial security spot in users’ devices. Running an application possessing sensitive information on a rooted device is relatively unsecured. Hence, prohibiting applications from running on a rooted device is recommended.

Unfortunately, there is no “silver bullet” to detect root devices. To do so, we need to verify a long list of indicators, such as root management applications, potentially dangerous applications, root cloaking applications, etc., which can vary given the diversity of Android manufacturers on the market.
Below are some solutions for detecting rooted devices to an extent:
-
SafetyNet is the official root detection package for Android, which is provided and maintained by Google. It detects rooted devices with modifications.
Yet there are still some cons, such as the Magisk Hide feature cannot be bypassed, complex implementation, quota limitation, and theGoogle Play Servicesis required (if not, SafetyNet will not work). - RootBeer is another popular solution. It works by checking the presence of specific applications/files on the device. The implementation is quite simple, but there is false-positive. You should notice this in your implementation and test it as much as possible.
- Some other interesting libraries such as SuperUser, RootTools, Firebase Crashlytics check provide a way to detect rooted devices. Unfortunately, most are outdated, uncommon, or no longer maintained.
WebView
WebView is a typical solution to display web content inside the application without opening an external browser. Therefore, WebView also carries potential web security vulnerabilities such as “Cross Site Scripting”, or XSS.
So, if your applications contain WebView, here are some best practices to follow:
- Do not enable Javascript with
setJavaScriptEnabled()if there is no specific required action with the web content. WebView does not allow JavaScript execution by default, so XSS is preventable if we don’t intentionally enable it. - Use the
clearCache()method. If your application accesses sensitive data with WebView, this method is recommended to delete any information stored locally when the session is completed. You can also use server-side headers such asno-cacheto indicate that an application should not cache certain content. - Replacing WebView usage from your application, try the Chrome Custom Tabs. It is highly recommended since it works like a Web browser, is more efficient, and performs better than WebView.
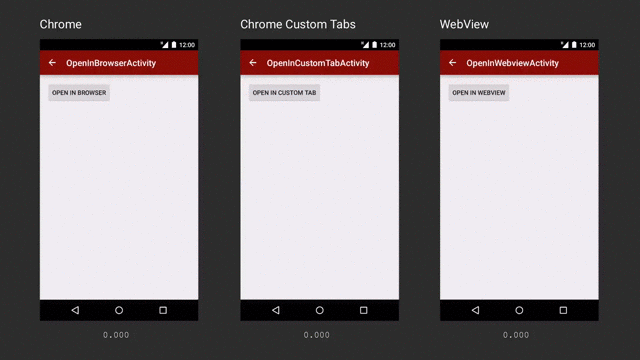
Ref: https://medium.com/google-developers/best-practices-for-custom-tabs-5700e55143ee
The comparison shows that Chrome Custom Tabs can download content the fastest among the three options above.
4. Source Code Protection
With all the practices mentioned earlier to reinforce security from our implementation, there is still another loophole that attackers can leverage. By default, anyone can decompile and unpack an application package to access the source code or exploit it. This exercise is commonly known as “Reverse Engineering” - the act of dismantling an object to see how it works.
Code Obfuscating helps to reduce application size by shortening and obfuscating the names of classes, methods, and fields in the codebase. This makes it harder to read the reversed version of the codebase.
A well-known tool to achieve Code Obfuscating is Proguard. But note that when you build your project with the Android Gradle plugin 3.4.0 or newer, the plugin no longer uses ProGuard to perform compile-time code obfuscation or optimization. Instead, the plugin works with the R8 compiler to handle the following compile-time tasks:
- Code shrinking (or tree-shaking)
- Resource shrinking
- Obfuscation
- Optimization
To activate these optimizations, you will need to configure from your gradle build config file as below:
android {
    buildTypes {
        release {
            // Enables code shrinking, and deobfuscation.
            minifyEnabled true

            // Enables resource shrinking
            shrinkResources true

            // Use the default ProGuard rules files or customize one for your project. They are compatible with R8.
            proguardFiles getDefaultProguardFile(
                'proguard-android-optimize.txt'),
                'proguard-rules.pro'
        }
    }
    ...
}
💡 R8 uses ProGuard rules files to modify its default behavior. Thus, updating the Android Gradle plugin to use R8 should not require changing your existing rules.
Conclusion 🌟
In these modern days, with the development of technology, there raises the threat of cybersecurity. It brought up more challenges that developers should always be cautious of. They must not only build and protect their applications but also put appropriate measurements to users’ personal data.
Of course, security on applications and mobile devices is not limited to what we mentioned above. It is recommended that we must keep learning and practicing development with safety to prevent future risks.
The security-centric need might depend on your individual mindset or deployment environments. Nevertheless, with data protection, secure networking, and accessibility awareness, you can start covering a significant security part of your mobile applications.
References
Security with network protocols
Changes to Trusted Certificate Authorities in Android Nougat
How To Find SSL Certificate Fingerprints
End-To-End Encryption (E2EE)
App security improvement program
Work with data more securely
11 Mobile Application Security Facts You Need to Know
SSL Pinning in Android
3 Ways How To Implement Certificate Pinning on Android
Securing Android’s DataStore
Shrink, obfuscate, and optimize your app
Best Practices for Custom Tabs
Custom Tabs from Chrome Developers